XRP NFTs Minting and Trading Dapp
An XRPL Hackathon Project
For this project I made use of the XLS-20 Standard preliminary implementation in the XRP Ledger protocol to create a dapp for NFT minting, management and trading. Build with XRPL, MongoDB and Svelte.
Problem and solutions
Following the XRPL NFT minting examples I found 3 big problems:
- For a non-developer create a NFT on XRP is hard (and there is no website to do so!)
- The example tutorial uses a predefined IPFS url, it does not support image with custom metadata
- There are lots of parameters that need to be known by user to interact with the NFTs, making it confusing and tedious
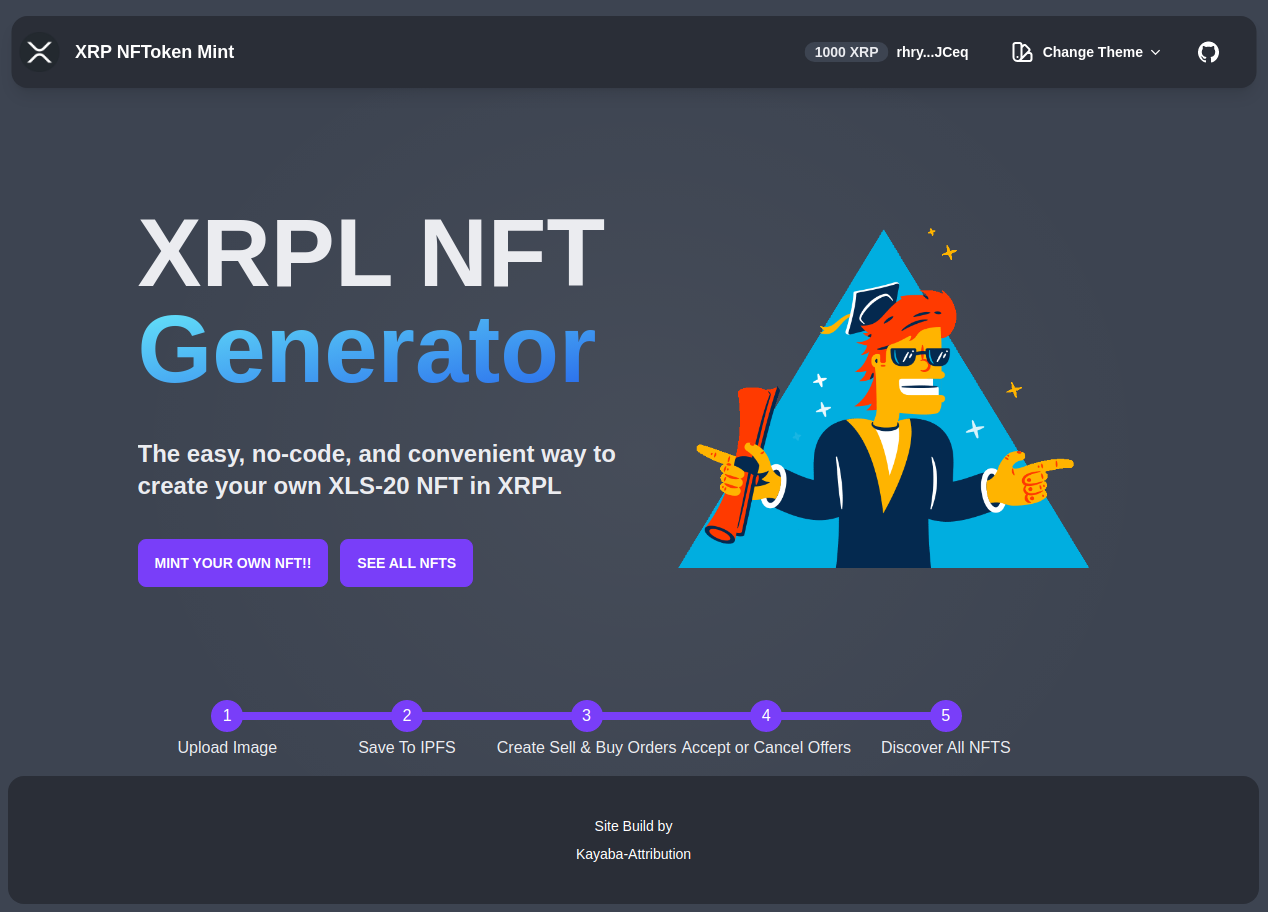
My solution: The easy, no-code, and convenient way to create, manage and trade your own XLS-20 NFT in XRPL
- Simple, Easy To use UI
- Upload Custom Images and descriptions, Images are added to IPFS via Pinanta
- No Configuration, Create Buy and Sell Orders, Manage your NFTs, and trade the on the market
Go mint an NFT on XRPL: https://xrp-nft-minter-hackathon.vercel.app/
Repo: https://github.com/Kayaba-Attribution/XRP-NFTs-Hackathon
Video (This was a one-take before a lot of improvements): https://www.youtube.com/watch?v=N9tE9FJ_zfM&t=23s
XRPL NFT Conceptual Overview
The XLS-20 standard for NFTs has a preliminary implementation that can be used in test networks, but is not yet available as an amendment to the XRP Ledger protocol. An amendment may be included in a future XRP Ledger release.
Fungible tokens can be easily traded between users for XRP or other issued assets on the XRP Ledger’s decentralized exchange. This makes them ideal for payments.
NFT Extensions
Extensions to the XRP Ledger support two new objects and a new ledger structure.
The NFToken is a native NFT type. It has operations to enumerate, purchase, sell, and hold such tokens. An NFToken is a unique, indivisible unit that is not used for payments.
The NFTokenPage object contains a set of NFToken objects owned by the same account.
General Notes
By following a cool tutorial in the XRP Ledger docs Here, I got the sufficient knowledge to use as a fondation and create my dapp. Coming from a 100% EVM compatible blockchain this was quite different but cool.
Before all the txns and interactions we must first connect to the XRPL, in order to use this we need a wallet “secret” this would be the equivalent of your ETH private key or seed phrase. Although not explicit in the docs it seems that we must connect and disconnect from the ledger on every transaction.
To obtain your NFT-Devnet Cretendials you need to request from this website
Ledger Connection
The connection always follow this format:
async function foo() {
    // build a wallet from the secret
    const wallet = xrpl.Wallet.fromSeed(secret)
    // create a client using the NFT testnet webhook url
    const client = new xrpl.Client("wss://xls20-sandbox.rippletest.net:51233")
    // establish the connection
    await client.connect()
    console.log("Connected to devnet")
Send a TX
Because XRPL does not offer Smart Contracts it makes use of pre-defined methods in order to send a tx that changes the state of the chain the docs recomment this format:
    // build the transaction with the info you need
    const transactionBlob = {
        // specify the method
        TransactionType: "NFTokenMint",
        // Method parameters
        Account: wallet.classicAddress,
        URI: xrpl.convertStringToHex(tokenUrl.value),
        Flags: parseInt(flags.value),
        TokenTaxon: 0
    }
    // send the tx with your wallet signer
    const tx = await client.submitAndWait(transactionBlob,{wallet})
    // optinal: get the balance changes for this tx
    console.log("Balance changes:", JSON.stringify(xrpl.getBalanceChanges(tx.result.meta), null, 2))
Read from the ledger
Because we are not making any changes to the ledger there is no need for a signer so we can read (again using methods) like this:
async function foo() {
    const client = new xrpl.Client("wss://xls20-sandbox.rippletest.net:51233")
    await client.connect()
    const nfts = await client.request({
        method: "account_nfts",
        account: ANY_ACCOUNT
    })
    console.log(nfts)
}
Technical Dive
Upload Images and their decription to IPFS
The easiest way to pin JSON objects to IPFS is to use Pinata, now the recommended way to do this is to use the Pinata SDK but as I was only using this function I found this solution easier. I have a global object info which get populated with inputs fields (name, description), the image is upladed and automatically encoded into base64 string by Svelte, finally the issuer is the address that generates the secret.
    const pinJSONToIPFS = async () => {
        const info = {
            "name": "Kayaba Test",
            "description": "XLS-20 standard for NFTs testing",
            "issuer": "",
            "image": "",
        }
        let url = `https://api.pinata.cloud/pinning/pinJSONToIPFS`;
        const response = await fetch(url, {
            method: 'POST',
            headers: {
                'Content-Type': 'application/json',
                pinata_api_key: pinataApiKey,
                pinata_secret_api_key: pinataSecretApiKey
            },
            body: JSON.stringify(info)
        });
        var res = await response.json()
        hash = res.IpfsHash
        console.log(hash)
    }
Minting A NFT [NFTokenMint]
XRPL uses flags to categorize NFTs types as follows:
- 1 -> Burnable
- 2 -> Only XRP
- 4 -> TrustLine Creates a trust line from the creator to get the transfer fees
- 8 -> Transferable if not present only can be from or to the creator
The NFTokenMint basic field needed are the following
    // build the transaction with the info you need
    const transactionBlob = {
        // specify the method
        TransactionType: "NFTokenMint",
        // Method parameters
        Account: wallet.classicAddress,
        // URI the IPFS Url
        URI: xrpl.convertStringToHex(tokenUrl.value),
        // Type of NFT
        Flags: 8,
        // Optional Identifier
        TokenTaxon: 0
    }
    // send the tx with your wallet signer
    const tx = await client.submitAndWait(transactionBlob,{wallet})
And the result of the txn:
{
    "id": 5,
    "result": {
        "Account": "r4B8gFnKqqTGEYjAd7r1BssWUFwCDr7jQ",
        "Fee": "12",
        "Flags": 8,
        "LastLedgerSequence": 401768,
        "Sequence": 395447,
        "SigningPubKey": "03E47F0A51AB5A769EC5BE0CE4BECBF2CA1DEE53C9775BD38DDBDC446A5C43AB2E",
        "TokenTaxon": 0,
        "TransactionType": "NFTokenMint",
        "TxnSignature": "3045022100A915521644B6D0B4E87E18EB06DDFD45EAC9BCBA76640689530EA18DE170C05602200B65B0607206EFD4D44D8796D30A818464A30C1944FC988D55E0378591B6CECA",
        "URI": "68747470733A2F2F676174657761792E70696E6174612E636C6F75642F697066732F516D565A504134735045336739574271666B6F71667332765A636438514E48376E37704B7363554C36454C6A3550",
        "date": 700703210,
        "hash": "5759FE4C8A33D7C9F3483E7CCD45F638D57FE7B530133C5EFC23E98A17A75FE7",
        "inLedger": 401750,
        "ledger_index": 401750,
        "meta": {
            "AffectedNodes": [
                {
                    "ModifiedNode": {
                        "FinalFields": {
                            "Flags": 0,
                            "NonFungibleTokens": [...]
                        },
                        "LedgerEntryType": "NFTokenPage",
                        "LedgerIndex": "0401BD852B9C9E81E196CE0C687774732377FE31FFFFFFFFFFFFFFFFFFFFFFFF",
                        "PreviousFields": {
                            "NonFungibleTokens": [...]
                        },
                        "PreviousTxnID": "0A4E17DB6BC2ECDCCDDB9DACA72EFD0468A5557964A7C8617E3CF5DF6FECF1FD",
                        "PreviousTxnLgrSeq": 395984
                    }
                },
                {
                    "ModifiedNode": {
                        "FinalFields": {
                            "Account": "r4B8gFnKqqTGEYjAd7r1BssWUFwCDr7jQ",
                            "Balance": "9999999880",
                            "Flags": 0,
                            "MintedTokens": 5,
                            "OwnerCount": 6,
                            "Sequence": 395448
                        },
                        "LedgerEntryType": "AccountRoot",
                        "LedgerIndex": "F77E0898A6D50B851E98C888FE9E1DF3F69C920FF200E4765B156881E6BD888C",
                        "PreviousFields": {
                            "Balance": "9999999892",
                            "MintedTokens": 4,
                            "Sequence": 395447
                        },
                        "PreviousTxnID": "D45215EAAED7D6AEED4038AF89EDA28DBB2499FD0CE0CE455E9463BBA9301D1C",
                        "PreviousTxnLgrSeq": 396000
                    }
                }
            ],
            "TransactionIndex": 0,
            "TransactionResult": "tesSUCCESS"
        },
        "validated": true
    },
    "type": "response"
}
In order to track the NFTs that are being minted in the Dapp I made use of MongoDB, on each Mint Success the info of the token is saved in the database, now I assumed that the ID of the NFTs would match the order of creation and the reponse but it turns out that this is not the case.
To find the tokenId of the latest NFT created by the wallet I had to make 2 account_nfts calls that returns an array of the NFTs held by the account then format the response,compare them and get the difference. Here is the function:
export async function findNewTokenId(before, after){
    let _before = []
    let _after = []

    console.log(before)
    console.log(after)

    for (let i = 0; i < after.length; i++) {
        _after.push(after[i].TokenID)
        if(i < before.length){
            _before.push(before[i].TokenID)
        }
    }

    let difference = _after.filter(x => !_before.includes(x));

    console.log("New Token ID:", difference)
    return difference
}
All of the other Transactions Methods can be found in the documentation
Wallet Page
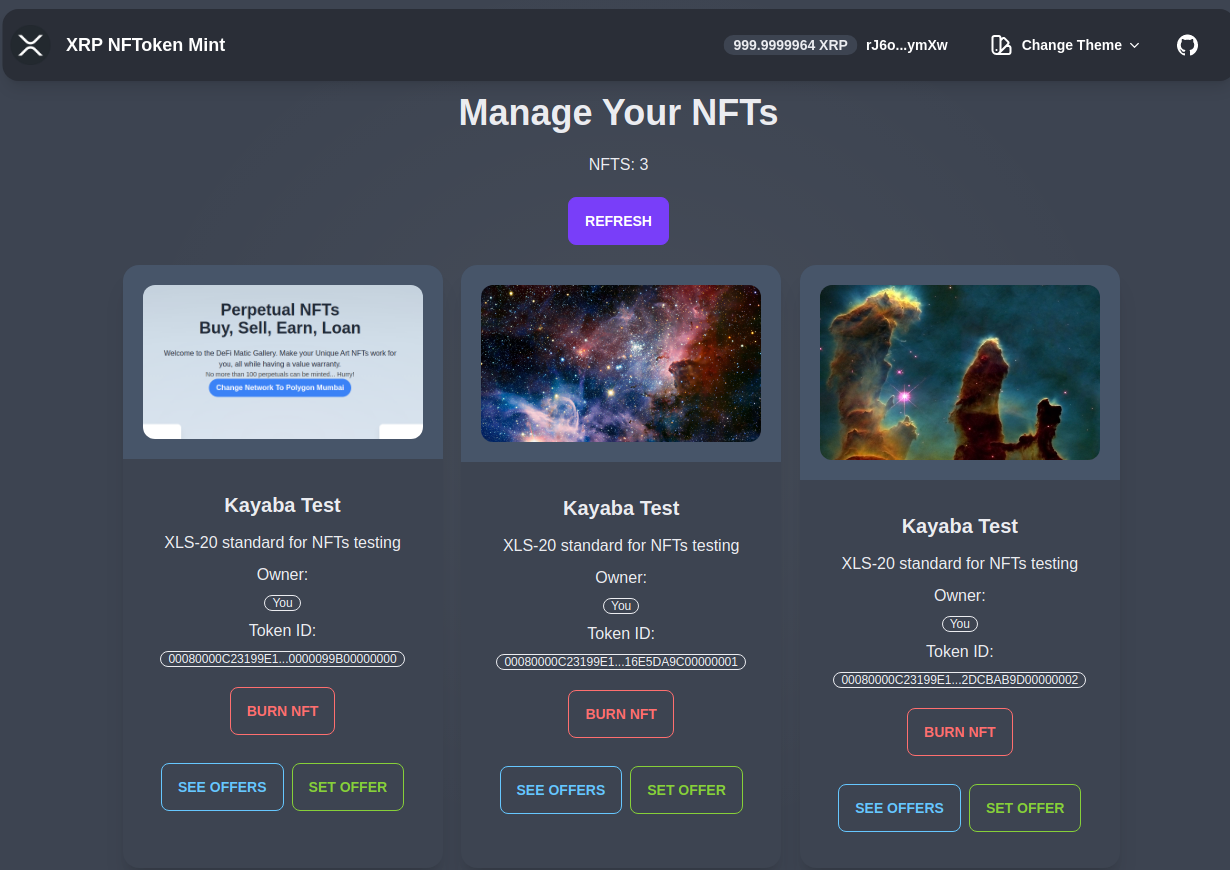
First I thought that I only needed to call account_nfts and display the NFTs but remember that when we mint a NFT the URI is converted to Hex? Then, I had to converted back to a string.
But thats not all! What is the URI? an IPFS Url! I had to make an extra call for every URI get the info and save it. Then I could display the NFTs.
let nfts = []
let CleanNFTs = []
async function getNFTS() {
const wallet = xrpl.Wallet.fromSeed($secret)
const client = new xrpl.Client("wss://xls20-sandbox.rippletest.net:51233")
await client.connect()
console.log("Connected to Sandbox")
//get all NFTs for address
const res = await client.request({
method: "account_nfts",
account: wallet.classicAddress
})
nfts = res.result.account_nfts
console.log(nfts)
//Convert URI to String and make the extra call
//save the json obejct into the CleanNFTs array
var obj;
for (let i = 0; i < nfts.length; i++) {
let url = xrpl.convertHexToString(nfts[i].URI)
const res = await fetch(url)
.then(res => res.json())
.then(data => obj = data)
console.log("Response:", obj)
CleanNFTs.push(obj)
}
console.log("NFTs", nfts)
console.log("NFTs", CleanNFTs)
client.disconnect()
return CleanNFTs
}
// refresh
async function refreshInfo() {
nfts = []
CleanNFTs = []
CleanNFTs = await getNFTS()
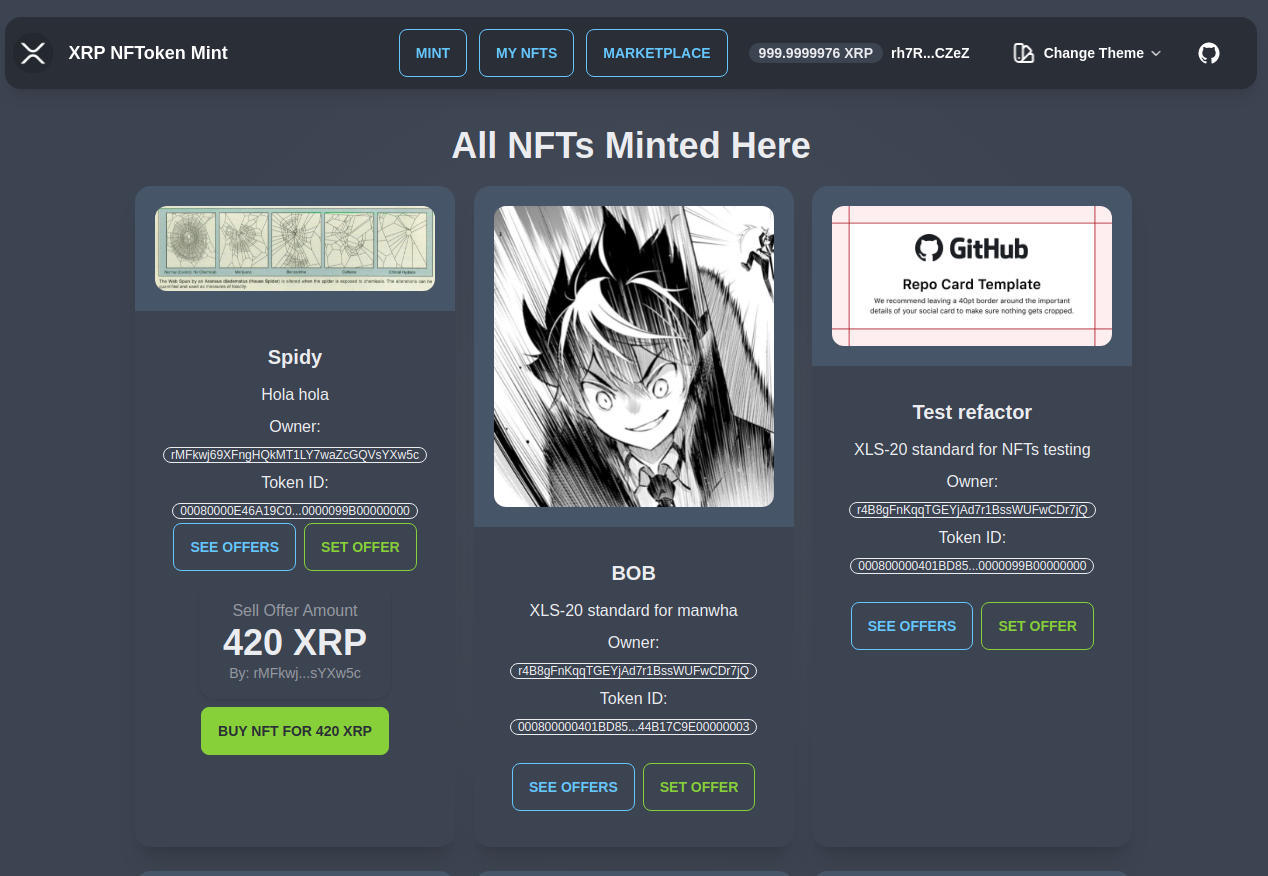
}All NFTs Page
In comparison to the previous page this was super easy. API call and display the NFTs
	let nfts = [];
    onMount(async () => {
        const res = await fetch(`/api/nfts`);
        nfts = (await res.json()).reverse()
    })
Handling the Secret Global State
Unlike in metamask where users can connect to a site I had to create a system that allows the app to use the secret and something to store the secret over sessions.
Decided to store the secret in localStorage (I know is not a best practice) it seemed enough for a hackathon, I used these 2 to save and load the secret
export async function loadSecretFromLocal(){
    if(localStorage.getItem("secret")){
        await addWallet(localStorage.getItem("secret"))
    } else{
        console.log("No Secret in Storage")
    }
}

export async function saveSecretLocal(_val){
    try {
        localStorage.setItem("secret", _val)
    } catch (e) {
        console.log("Error on secret save", e)
    }
}
To allow all the pages to access the info I create stores for the variables that I needed
export const secret = writable('')
export const address = writable('')
export const balance = writable('0')
export const nativeBalanceUSD = writable('0')
To connect a wallet I used a helper function that loads the secret in localstorage, updates the stores, and fetches the wallet balance and calulates the value in USD
export async function addWallet(input_secret){
    const wallet = xrpl.Wallet.fromSeed(input_secret)
    const client = new xrpl.Client("wss://xls20-sandbox.rippletest.net:51233")
    await client.connect()
    console.log("Connected to Sandbox")

    const response = await client.request({
        "command": "account_info",
        "account": wallet.classicAddress,
        "ledger_index": "validated"
    })
    //save secret localStorage
    saveSecretLocal(input_secret)
    //Update Stores With New Info
	secret.update(n => input_secret);
    // save accout
    let _account = response.result.account_data.Account
    address.update(n => _account);
    // save balance
    let _balance = response.result.account_data.Balance
    balance.update(n => _balance);
    // save nativeBalanceUSD
    let _nativeBalanceUSD = Number(_balance)/10**7 * (await spotUSD("XRP")) + " USD"
    nativeBalanceUSD.update(n => _nativeBalanceUSD)

}
If you are curious about getting the spot price I re-used and old function from past projects:
// Most coins supported
export async function spotUSD(_symbol){
    let response = await fetch('https://api.binance.com/api/v3/ticker/price?symbol='+_symbol +'USDT');
    response = await response.json();
    let price = Number(response.price).toFixed(2)
    console.log(`💲 ${_symbol} to USD: ${price} USD 💲`)
    return price
}
// For more underground coins
export async function spotMTR(){
    let response = await fetch('https://api.coingecko.com/api/v3/coins/meter-stable');
    response = await response.json();
    let price = Number(response.market_data.current_price.usd).toFixed(2)
    console.log(`💲 MTR to USD: ${price} USD 💲`)
    return price
}
And that is pretty much it, I wont go into detail for the buy/sell orders because the XRPL Documentation already does it.
Extras
- Most actions have error handling and load animations
- Depending on the wallet that is connected buttons are rendered or not (only the creator of a buy offer can see the cancel offer button)
- If you are the creator of a NFT then only you can see the burn button, and so on.
Links and Conclusion
It was quite fun to create work on this project, it is definitely a new world coming from EVM but the XRPL is well implemented and documented with great examples. This project has the aim to allow any user to get their feet wet into the XRPL NFTs and have a great time doing so. In the future, I may work on this a little more, enable collections creation (instead of single NFTs), add search filters, integrate all the newly minted NFTs (not only the ones minted in the app) and create a royalty system. And of course, I have to work on the UI!
Go mint an NFT on XRPL: https://xrp-nft-minter-hackathon.vercel.app/
Repo: https://github.com/Kayaba-Attribution/XRP-NFTs-Hackathon
Video (This was a one-take before a lot of improvements): https://www.youtube.com/watch?v=N9tE9FJ_zfM&t=23s
Blog: https://www.kayaba-attribution.dev/posts/XRP%20NFTs%20Minting%20and%20Trading%20Dapp